
Caylent Services
Cloud Operations & Managed Services
Reliably Operate and Optimize Your AWS Environment
Learn how to use AWS Systems Manager (SSM) to automate and schedule Linux EC2 instance patching and updates — from installing the SSM agent and tagging instances to creating maintenance windows and patch baselines for secure, consistent OS maintenance.
This blog was originally written and published by Trek10, which is now part of Caylent.
We live in a world where we need to remember that OS or base packages on the instance need to be updated because security is critically important.
When in our ENV, there are a lot of instances. Sometimes it’s easy to make a mistake or we can forget to update one of the instances.
With AWS SSM we can schedule automatic updates for our EC2 instances.
AWS Systems Manager Agent (SSM Agent) is Amazon software that can be installed and configured on an Amazon EC2 instance, an on-premises server, or a virtual machine (VM). SSM Agent makes it possible for Systems Manager to update, manage, and configure these resources. The agent processes requests from the Systems Manager service in the AWS Cloud, and then runs them as specified in the request. SSM Agent then sends status and execution information back to the Systems Manager service by using the Amazon Message Delivery Service (service prefix: ec2messages).
For this article, I will create a small ENV. For better usage of SSM, we need to add correct tags to EC2 instances and install SSM agent on these instances.
Our update plan:
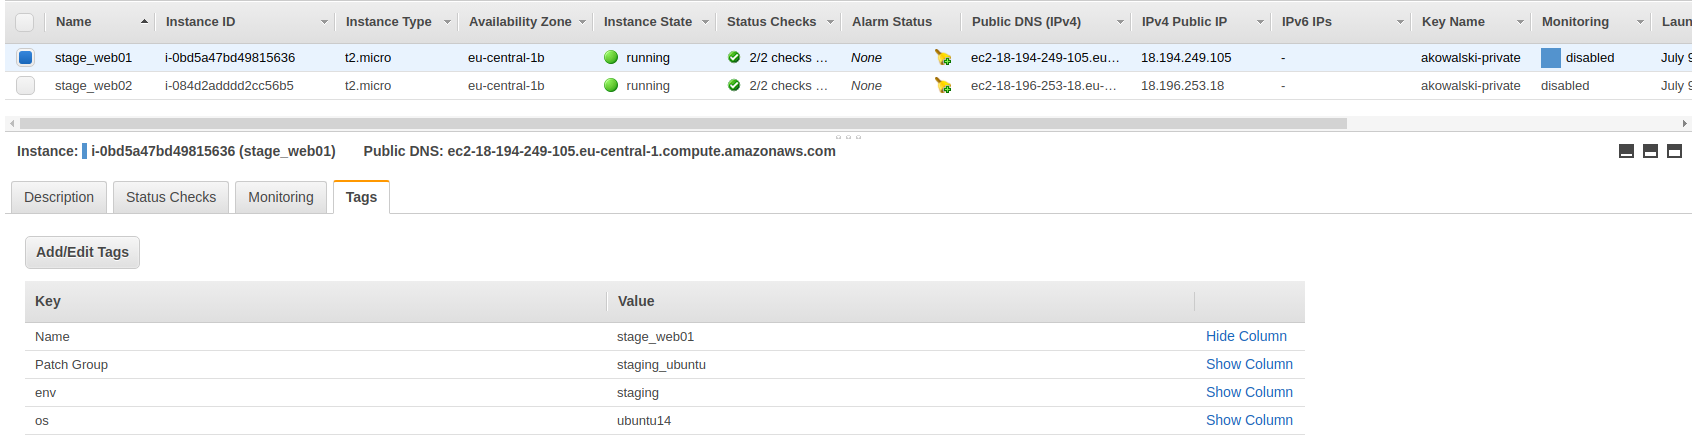
In Staging ENV there will be two EC2 instances using Ubuntu 14.04 OS (called stage web01 and stage web02).
If we have a large environment, tags are helpful. For our article, we will attach 3 tags to instances:
From these tags we know that instance is from environment staging using OS ubuntu 14 and this instance is part of the Patch Group ubuntu_staging. This is important later on.
SSM Agent is installed by default on the following AMIs:
Our instances are using The Ubuntu 14.04 which doesn’t have the SSM agent installed by default. We need to manually install SSM agent. You can read the AWS docs on installing the SSM agent.
By default, AWS Systems Manager doesn’t have permission to perform actions on your instances. You must grant access by using an AWS Identity and Access Management (IAM) instance profile. An instance profile is a container that passes IAM role information to an Amazon Elastic Compute Cloud (Amazon EC2) instance at launch. You can create an instance profile for Systems Manager by attaching one or more IAM policies that define the necessary permissions to a new role or to a role you have already created.
For following along in this article, you will need two IAM Roles.
The first IAM Role will be called role-for-ssm. This role will be attached to our two instances.
Go to the AWS Console -> IAM -> Roles and hit the “Create role” button
Create a role called role-for-ssm and attach the AWS manager policy called: AmazonEC2RoleforSSM

For more information, please read https://docs.aws.amazon.com/systems-manager/latest/userguide/setup-instance-profile.html
Please remember to attach the IAM Role role-for-ssm to our two instances.
Go to AWS Console -> EC2, select desired instance and hit Actions -> Instance Settings -> Attach/Replace IAM Role
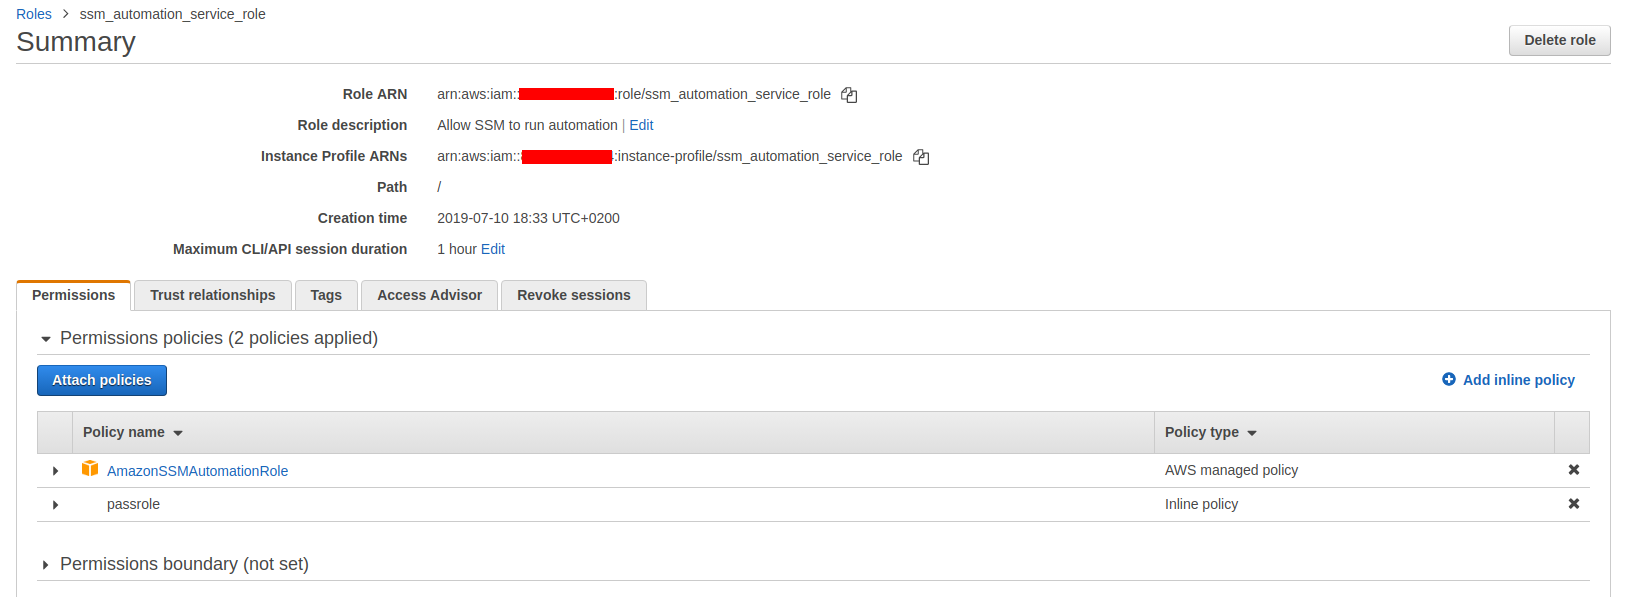
The second IAM Role will be called ssm_automation_service_role.
Before creating this role, please read this article and do Tasks 1,2,3
After you read this article and complete tasks, IAM role ssm _automation_ service_role should have an attached policy called “AmazonSSMAutomationRole” and one inline policy.
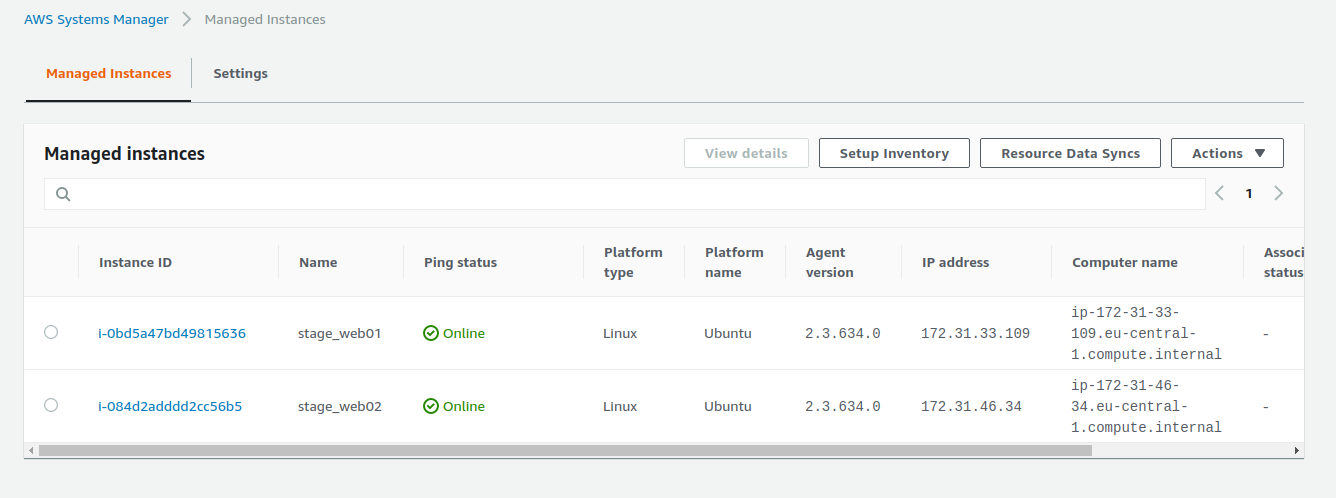
Check your environment, we need to be sure that SSM agent is working on instances:
For testing purposes, this entire env is launched in eu-central-1 in one AZ.
(Of course for high availbility needs, always try to launch multiple instances in different AZ)
Every instance has added an IAM Role for SSM and has installed SSM agent.
Please go to Managed Instances in AWS Systems Manager to check if we correctly added the IAM Role called role-for-ssm and if SSM Agent is working.
We should see our entire ENV there.
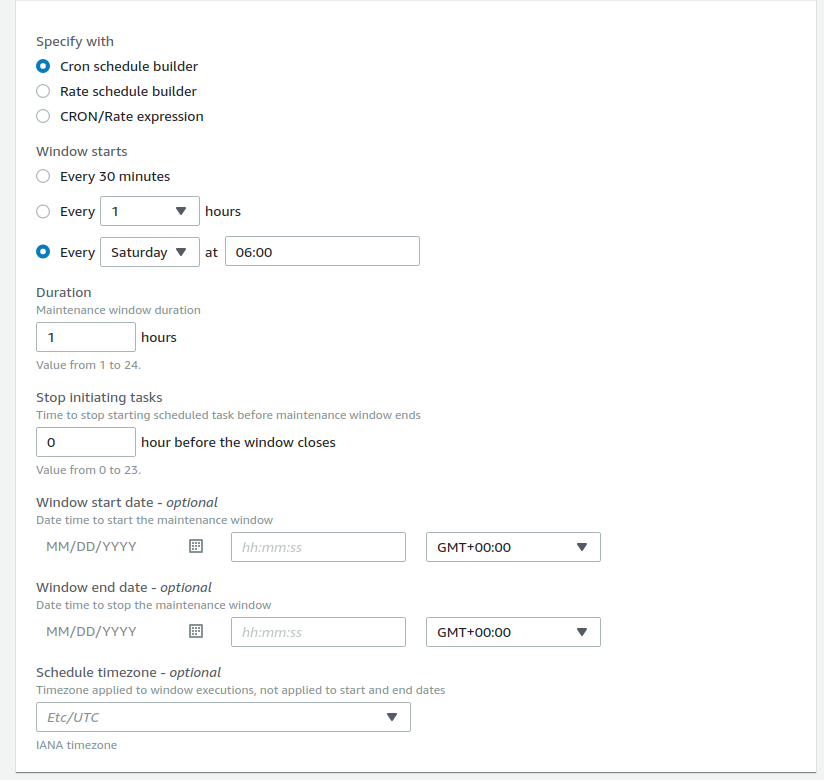
Now we need to create a Maintenance Window for our staging instances:
Please go to AWS Console -> Systems Manager -> Maintenance Windows and select create maintenance window.
Name: Ubuntu_Staging
Description: Maintenance Window for staging instances with Ubuntu OS
Check Allow unregistered targets
Check Cron schedule builder
Select Every Saturday at 06:00
Duration: 1 hour
Stop initiating tasks: 0 hour
Schedule timezone: Etc/UTC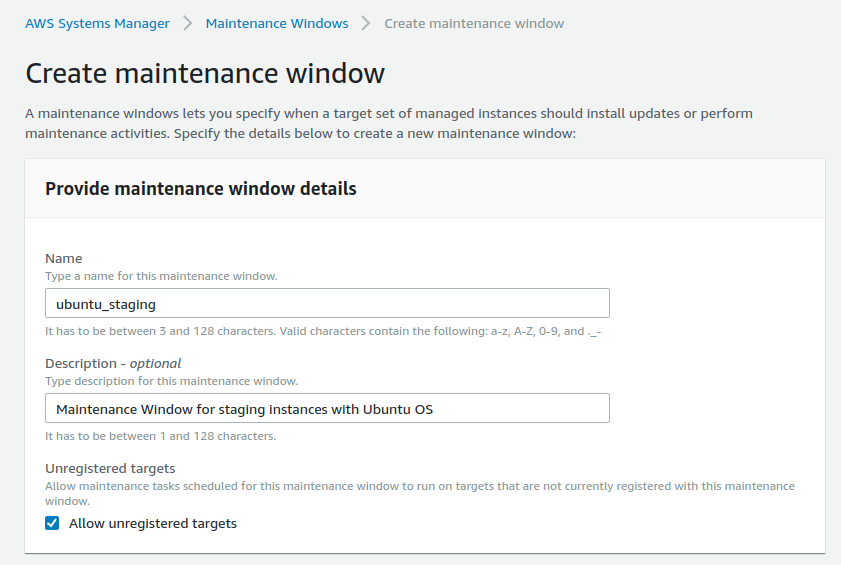
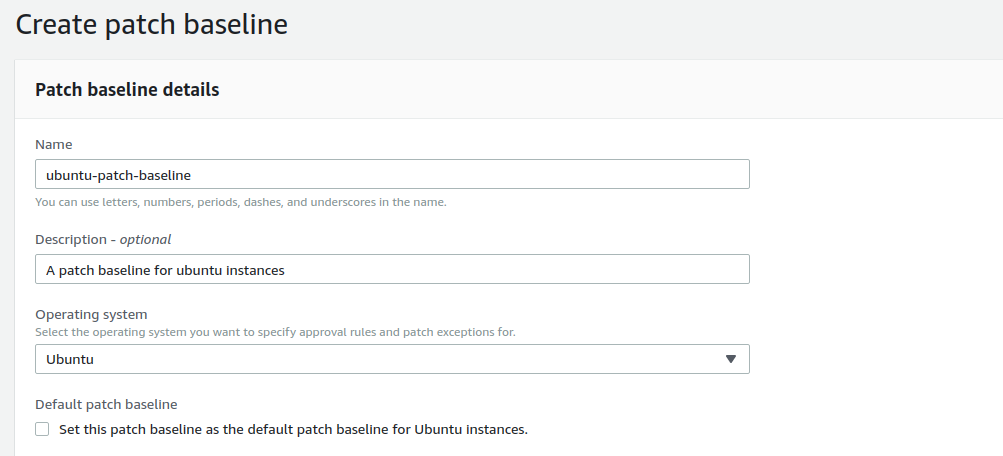
A patch baseline defines which patches are approved for installation on your instances. You can specify approved or rejected patches one by one. You can also create auto-approval rules to specify that certain types of updates (for example, critical updates) should be automatically approved. The rejected list overrides both the rules and the approved list.
More information about Patch baseline.
To create a new Patch baseline please go to the AWS Console -> Systems Manager -> Patch Manager and then click the Orange button: create patch baseline.
Name: ubuntu-patch-baseline
Description: A patch baseline for ubuntu instances
As a Operation system, Please select Ubuntu
Default patch baseline: don’t change - leave not marked.
Now we need to create a couple of rules:
Rule1
Product: All
Section: All
Priority: Required
Compliance reporting: Critical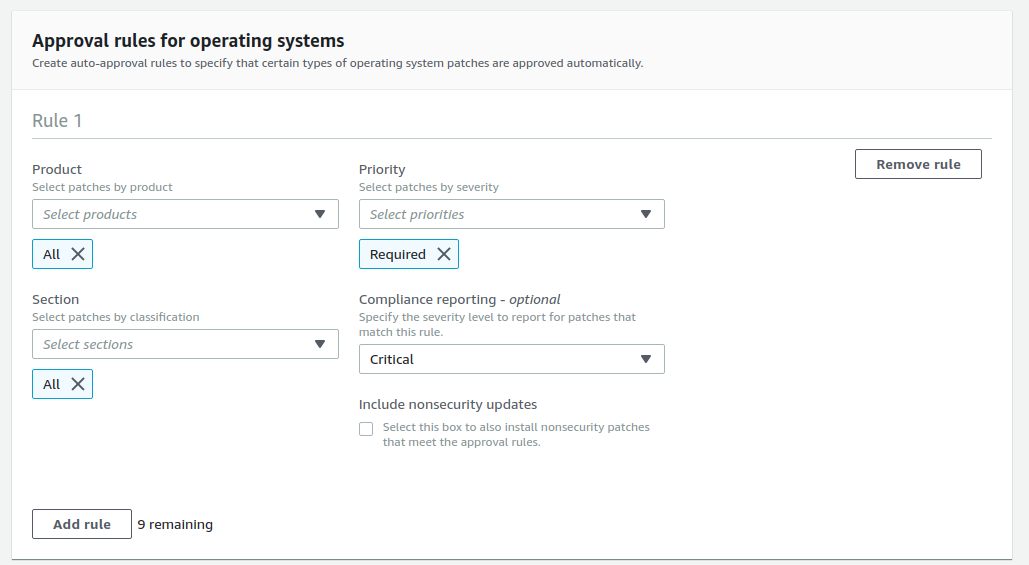
Rule2
Product: All
Section: Nothing
Priority: Important
Compliance reporting: Critical
Now click Create patch baseline, and if everything is fine we should see:

Now, this step is very important, we need to assign our custom Patch baseline with Patch Group tag.
Please, go to AWS Console -> Systems Manager -> Patch Manager
Find our Patch baseline for Ubuntu, Please use search by name: ubuntu-patch-baseline

Select our Patch baseline and click on Action -> Modify patch groups
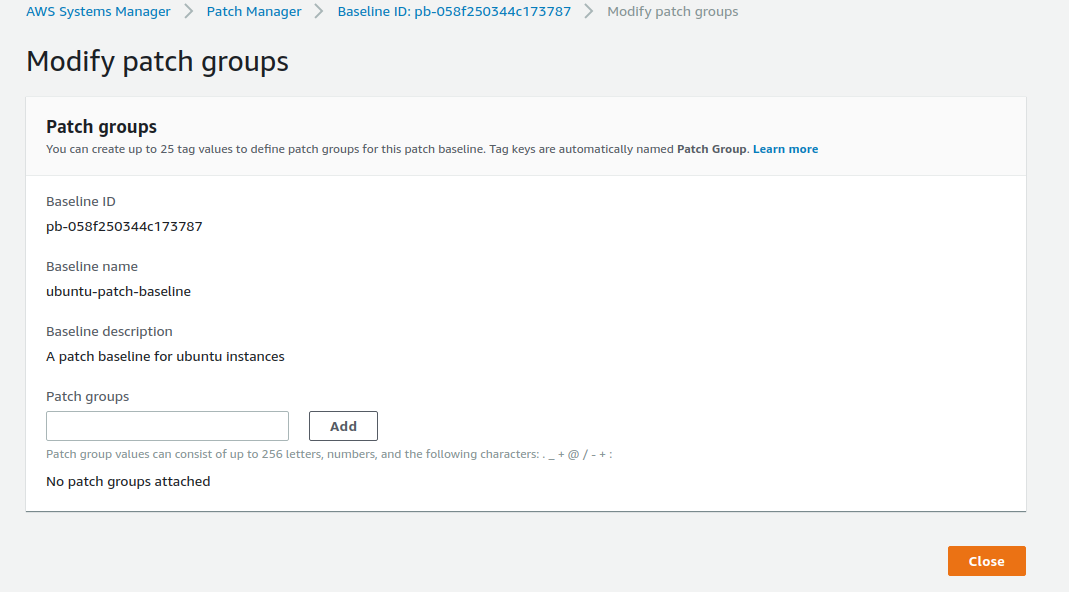
In Patch groups, add our tag: staging_ubuntu
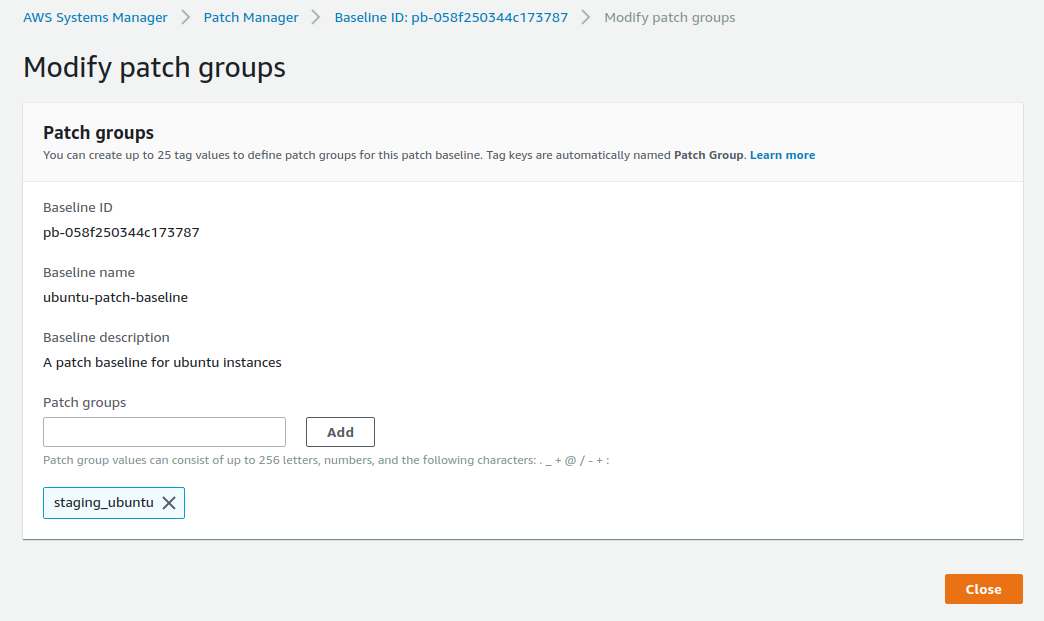
Now click Close.
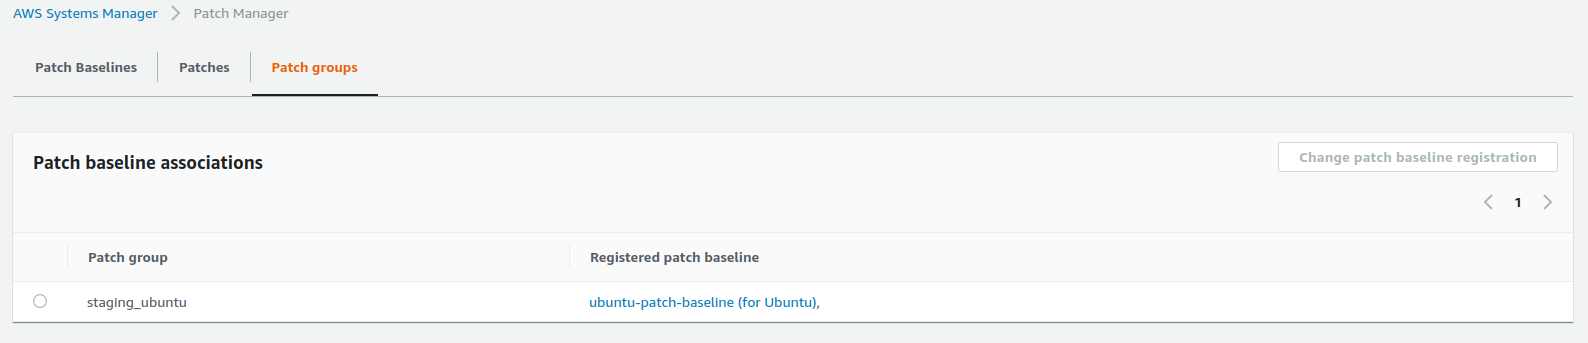
In Patch groups, we should see our Patch group, staging_ubuntu, registered with ubuntu-patch-baseline.
Please remember: If we don’t specify patch baseline to patch group, AWS will use the default patch baseline for the desired OS.
We want SSM to update only the instances with our tag Patch Group:staging_ubuntu
Please go to AWS Systems Manager -> Maintenance windows
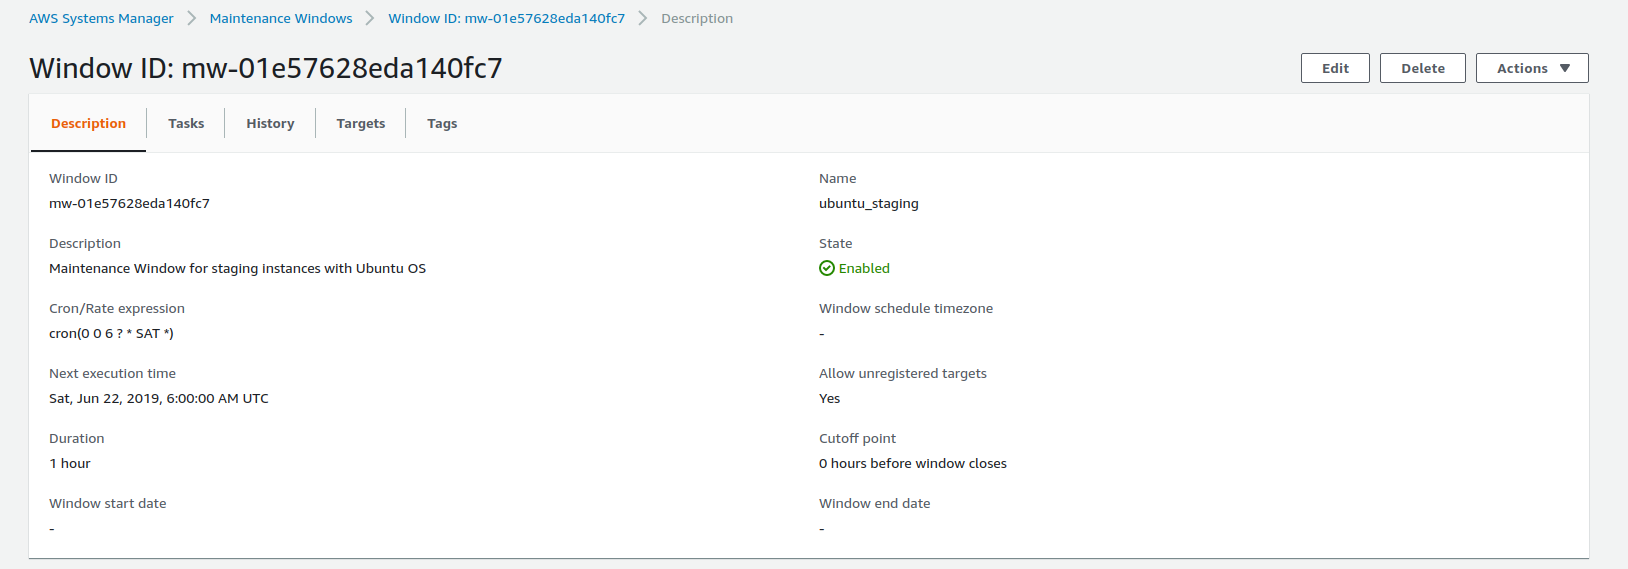
Search Maintenance window by name, ubuntu_staging, and click on the Window ID of the ubuntu_staging.
We should see:
Now we need to create maintenance window targets.
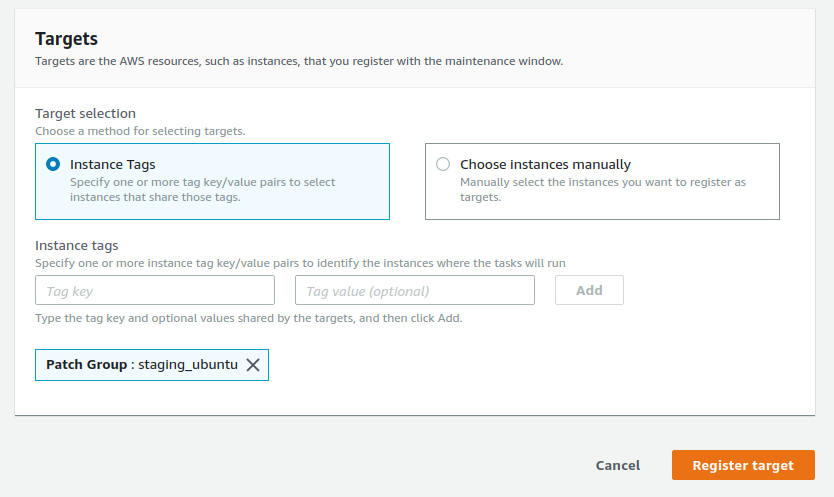
Click the Targets tab and register target.
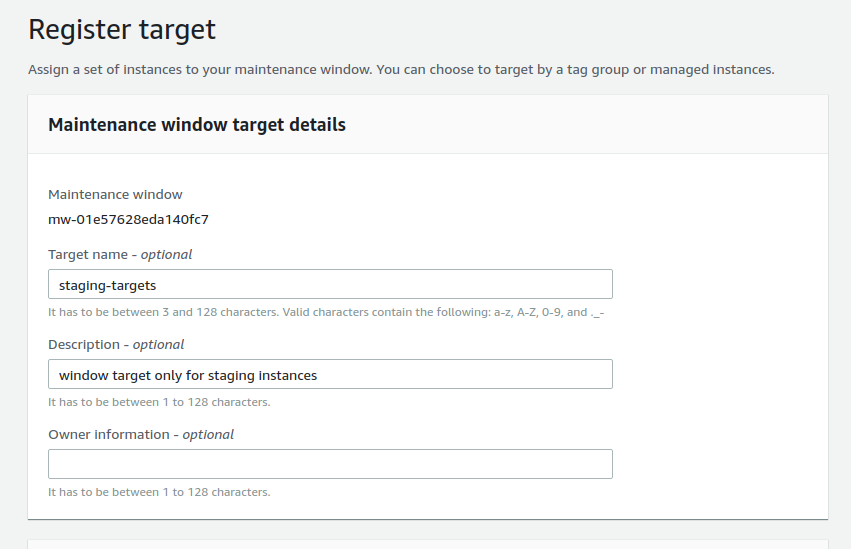
Target name: staging-targets
Description: window target only for staging instances
In Targets selection, please choose:
Instance Tags and type:
Tag key: Patch Group
Tag value: staging_ubuntu
Finally, click on Register target
We should see something like this:
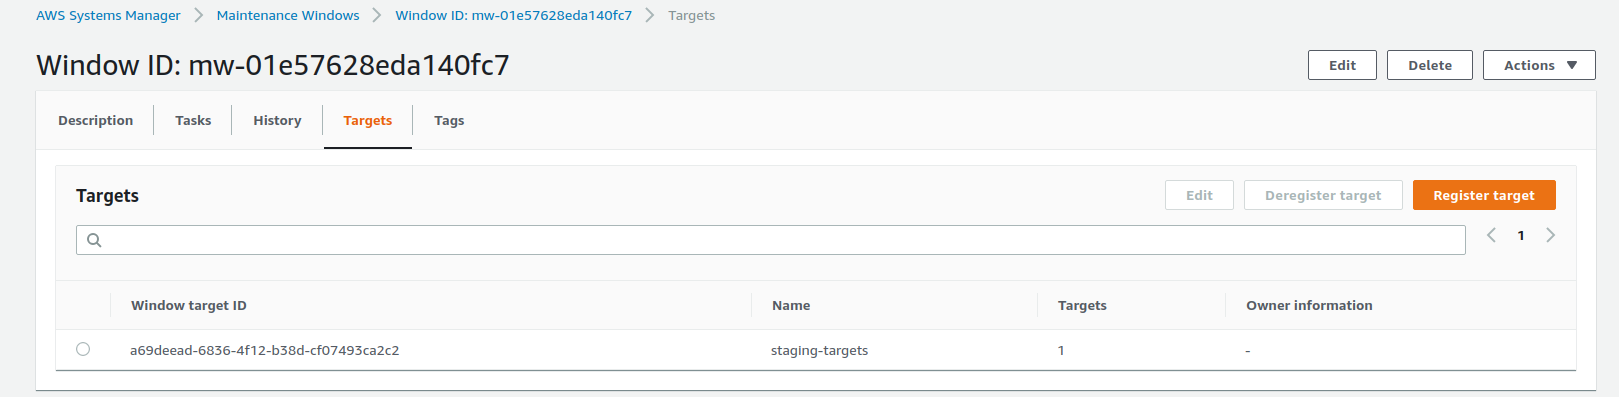
Now we have registered our instances with Maintenance Window.
So, if we add new instances with correct tags and IAM roles, new instances will be automatically added to this Maintenance Window.
Now we need to add tasks in the Maintenance window for staging ENV.
Please go to the AWS Systems Manager -> Maintenance windows.
Search the Maintenance window by name: ubuntu_staging, and click on Window ID of the ubuntu_staging.
Now click on Tasks.
The first thing we need to do is register the Automated task for creating AMI image before starting patching. This will be our backup plan. If there is something bad after patching, we can revert changes, launching a new instance from backup AMI.
To do this, please:
Click on Register tasks and select Register Automation task.
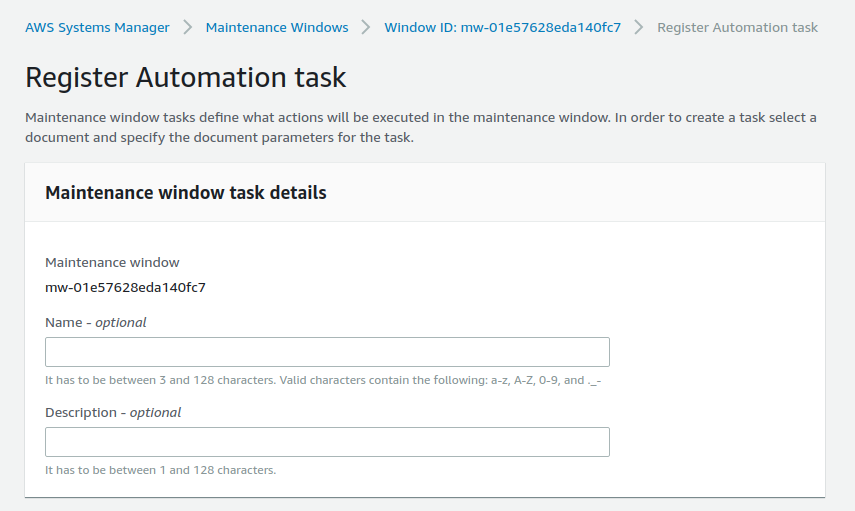
Name: Create_AMI_image
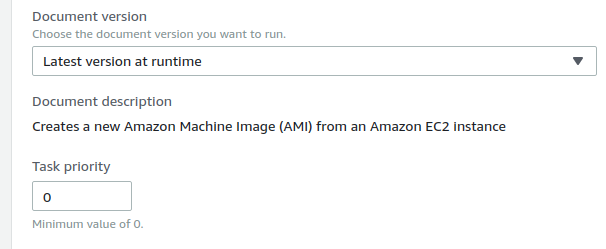
Description: This task will create an AMI image of the instances before patchingIn Automation document, please select AWS-CreateImage In Document version, select Latest version at runtime. In Task priority, type: 0
Task priority 0 - it’s the highest priority, it will be executed as the first task In Targets, we need to select staging-targets registered targets groups
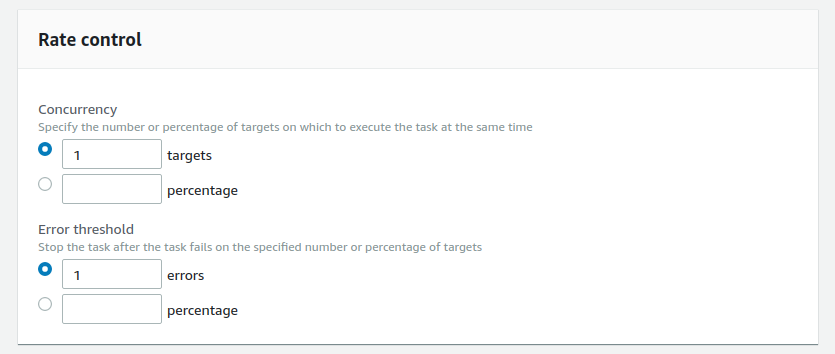
Rate control:
Here we can set how many instances can run this task at once.
If we have a very big environment, we can use a percentage, but, in our case, we will set 1 instance at a time.
In an error threshold, we set the value when this task should be stopped. So, if errors appear, this task will be stopped.
I recommend using 1.
Now select a custom service role that allows Maintenance Windows to interact with other AWS resources on your behalf.
In our case, it will be Role: ssm_automation_service_role

The last step to finish configuring automation for creating an AMI image is setting Input parameters.
Please type these parameters:
InstanceId {{TARGET_ID}}
NoReboot false

Then select the orange button, “Edit Automation task”
Thanks to these parameters, when SSM starts to work, it will first stop the instance and create an AMI image as a backup solution.
Now we need to create the 2nd task for Patching
Go to your Maintenance window -> tasks and choose Register Tasks. Then select Register Run command task.
Type: Name: PatchingTask

In the Command document, select AWS-RunPatchBaseline and enter 5 as the Task Priority

So in this case, the first task will be Create _AMI_ image because this has priority 0 and 2nd will be PatchingTask because it has lower priority (5)
In Targets, like before, we need to select our Window target ID called staging-targets

Rate control, we also need to set 1 target (this task will be executed on every instance in the target group - one by one) and stop after 1 error

Now we need to choose a service role for this task.
Like before, we need to use a role: ssm_automation_service_role

For this example, we don’t change Output options (this will be disabled) And we don’t need to enable SNS notifications.
In Parameters, select Operation - > Install. All other options will stay default.

Now click on the Edit Run command task, and we have finished configuring SSM.
For testing purposes, I have changed the Maintenance window for every Friday at 11:45 AM UTC.
After changing the Maintenance window, please remember to enable the Maintenance Window.

If we enable the Maintenance window, we should see something like this:

We should see Next execution time: Fri, Jul 12, 2019, 11:45:00 AM UTC
After 11:45, go to your Maintenance window and click on History, we should see something like:
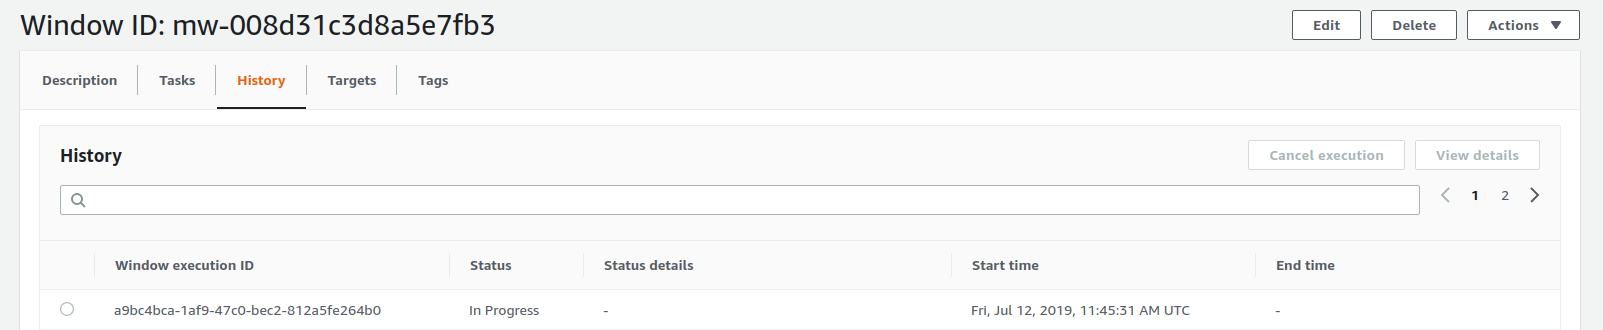
Our Window execution ID is “in Progress” - GREAT! Select our Window Execution ID and click on View Details.
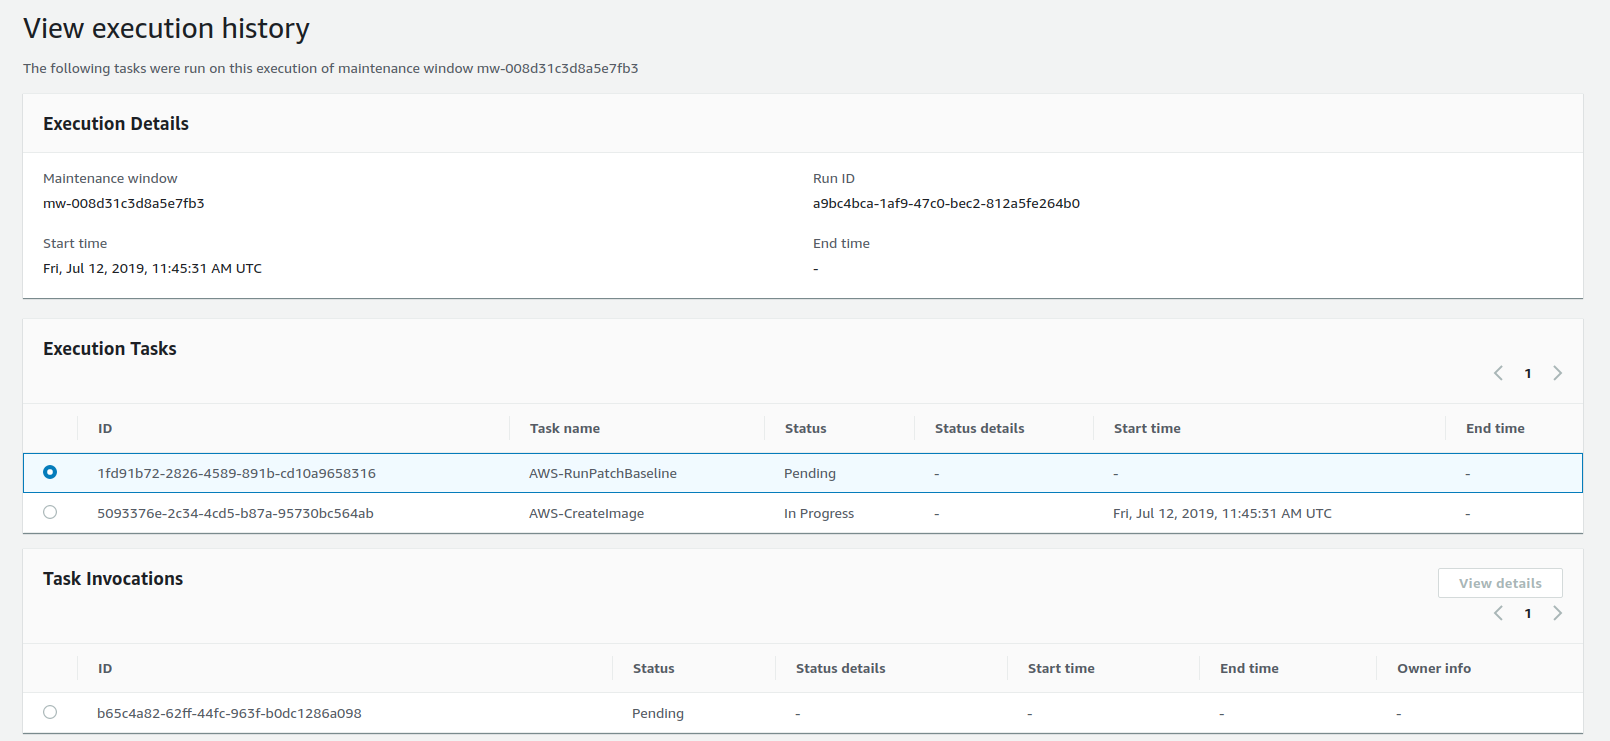
We see SSM is now tasked with creating an AMI image.
It should look similar when the patching task is in progress.
In the end, we should see something like this:
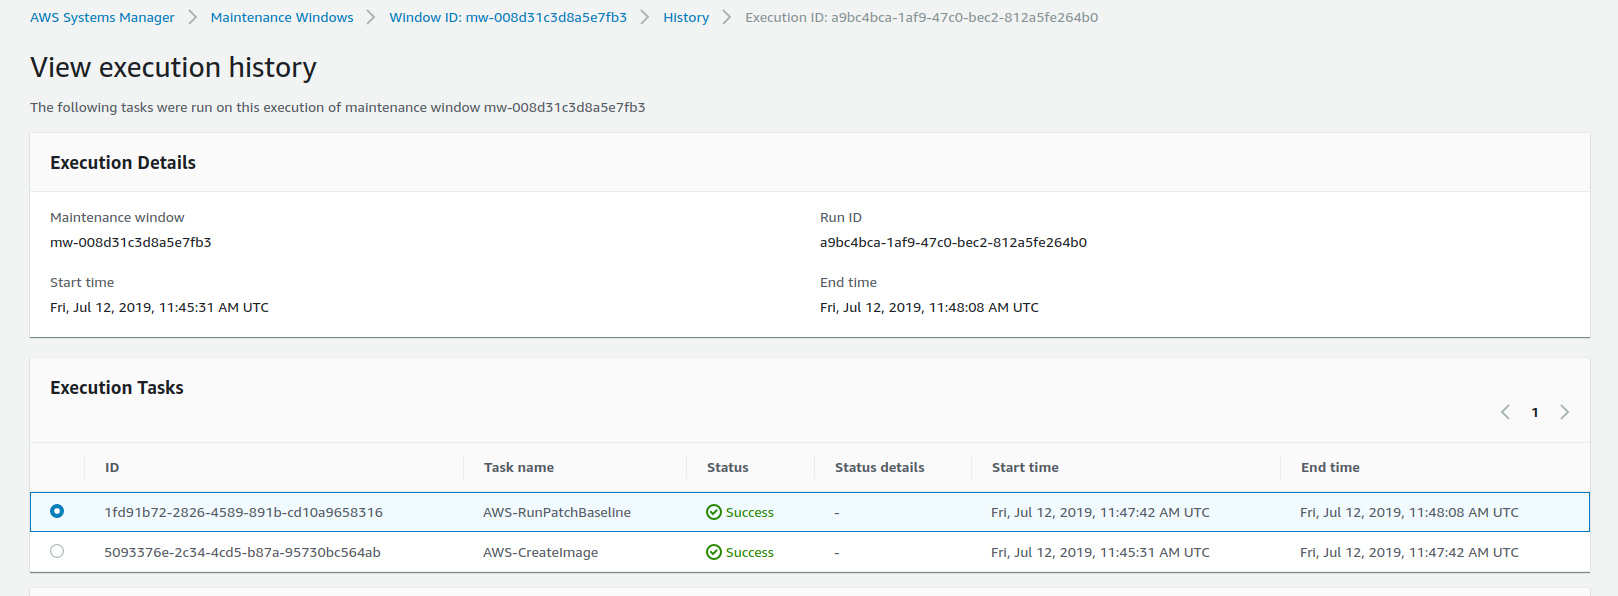
CONGRATULATIONS! We have successfully configured SSM to create an AMI image as a backup and then updated our instance.

Founded in 2013, Trek10 helped organizations migrate to and maximize the value of AWS by designing, building, and supporting cloud-native workloads with deep technical expertise. In 2025, Trek10 joined Caylent, forming one of the most comprehensive AWS-only partners in the ecosystem, delivering end-to-end services across strategy, migration and modernization, product innovation, and managed services.
View Trek10's articlesCaylent Services
Reliably Operate and Optimize Your AWS Environment
Caylent Services
Quickly establish an AWS presence that meets technical security framework guidance by establishing automated guardrails that ensure your environments remain compliant.


The reactive human-plus-tools model has hit its ceiling. Learn why world-class AWS agentic cloud operations require agents governed by domain experts.

Explore how Caylent and AWS are helping organizations move from AI experimentation to execution by combining agentic AI, modernization, and next-generation cloud operations to deliver faster, more secure, and more scalable business outcomes.

Explore Amazon OpenSearch Serverless NextGen, AWS's new scale-to-zero architecture that decouples compute from storage to deliver faster autoscaling, lower costs for idle and agentic AI workloads, and offers a new approach to managing search and vector search collections.