
Caylent Services
Cloud Native App Dev
Deliver high-quality, scalable, cloud native, and user-friendly applications that allow you to focus on your business needs and deliver value to your end users faster.
Learn how to automate testing and safeguard your JavaScript apps using Jest with AWS CodeBuild and CodePipeline.
If you’re coming across this article, you likely have a good understanding of why automated testing is so crucial to the success of your business. However, if you’re unfamiliar with the benefits, automated testing will save you money and time, increase application reliability, and increase team productivity. In some extreme yet real-world scenarios, it could even save you from losing hundreds of thousands of dollars in revenue by detecting a fatal bug before it makes its way into production. Reaping the benefits of automated testing is easier than you might think. Here in this blog, I’ll show you just how simple it is to safeguard your JavaScript application utilizing the Jest testing framework, AWS CodeBuild, and AWS CodePipeline.
Jest is a lightweight, simple JavaScript testing framework. It's open-source and written by the same Facebook open-source team that brought us React. It's straightforward and intuitive to use, allowing developers to focus more on building business logic rather than an intricate and hard-to-manage testing framework. It can be used to test applications written in JavaScript, TypeScript, Vue, Angular, and more, but most importantly, for our use case, React.
Jest is a truly robust tool that, if used right, will dramatically improve application reliability and the developer experience. It does more than simply allowing users to write unit and integration tests. Jest has a plethora of baked-in capabilities and features that allow developers to get the most out of their time when writing tests. The following are some of the most important capabilities of Jest that truly make a difference when it comes to safeguarding your application's reliability and user experience:
const isAvailable = checkAvailabilityFunction();
expect(isAvailable).toBeTruthy();
import renderer from 'react-test-renderer';
import Link from '../Link';

it('renders correctly', () => {
  const tree = renderer
    .create(<Link page="http://www.caylent.com">Caylent</Link>)
    .toJSON();
  expect(tree).toMatchSnapshot();
});
test('records audio', () => {
  const spy = jest.spyOn(audio,'record');
  const isRecording = audio.record();

  expect(spy).toHaveBeenCalled();
  expect(isRecording).toBe(true);
});Consider a simple React component rendering that displays a name passed in as a prop. We want to verify that the name is making its way into the component and rendering correctly in the Document Object Model (DOM). The following steps show how simple it is to set up a test with Jest to mimic this behavior. Keep in mind these libraries are ever-changing, and this tutorial will reference only a few of the libraries you may want to explore. This overview will give you an idea of how easy it is to write Jest tests and you can then pursue more complex examples based on your testing needs and goals. For complete documentation, check out the official Jest framework guides.
First, we need to install the following dependencies to make things work: React, React DOM, React Testing Library, and Jest. To do this, run the following commands in the terminal at your project directory.
npm i react

npm i react-dom

npm i @testing-library/react

npm i jestWe first create a React component that takes in a name and displays it after "Your name is:" if the name is defined. If the name is undefined, it renders, "You have no name!". Lastly, we give the component a test id to easily access it within our tests.
// file: src/pages/displayName/index.tsx
export function DisplayName({ name }) => {
	return (
		<div data-test-id='display-name-test'>
			{ name ? `Your name is: ${name}` : 'You have no name!' }
		</div>
	)
};
Typically Jest testing files are denoted with ‘.test.’ or ‘.spec.’. They can be placed in the same folder as the page or component you are testing or in a separate test folder. All of this can be configured within your Jest configuration file.
First, we will import the React component DisplayName and React Testing Library. We will use React Testing Library to render our component DisplayName. React Testing Library provides lightweight utility functions that we can call on top of React DOM to test our components.
We will then use Jest to describe and configure the test. In the test, we will use functions from React Testing Library and Jest to check if the component displays the name correctly. We will also write a second test that checks the condition where the name is undefined.
The first string passed to test( ) will be displayed in the console when running the tests with Jest. In the case of a test failure, this provides a way to know which test failed.
// file: src/pages/displayName/index.test.tsx
import { render, screen } from '@testing-library/react';
import { DisplayName } from './index';

describe('Tests for DisplayName', () => {
	test('DisplayName should display passed name prop', () => {
		render(<DisplayName name={'Friendly Tester'} />);
		expect(screen.getByTestId('display-name-test')).toHaveContext('Your name is: Friendly Tester');
	});
	test('DisplayName should display "You have no name!" if name is undefined', () => {
		render(<DisplayName name={undefined} />);
		expect(screen.getByTestId('display-name-test)).toHaveTextContent('You have no name!');
	});
});
AWS CodeBuild is a fully managed build service in the cloud meaning you don’t have to configure any of the underlying resources, AWS does it all for you. It takes the hassle out of compiling source code, running unit tests, and generating deployment-ready artifacts. By removing the burden of provisioning, managing, and scaling your own build servers, CodeBuild allows developers to focus solely on writing code and accelerating the software delivery lifecycle. The following are just some of the benefits and capabilities of AWS CodeBuild:
AWS CodePipeline is a powerful continuous integration and deployment tool that seamlessly orchestrates the entire software release process. CodePipeline automates the building, testing, and deployment of your applications, leading to quicker and more reliable application and infrastructure updates. Automation, as discussed in the introduction, is crucial for modern-day projects and businesses, and CodePipeline makes it easy to implement. The following explains some of the benefits and capabilities of AWS CodePipeline:
Now that we have a Jest test setup, we’ll want to automate it within our application build pipeline. That's where CodeBuild and CodePipeline come in. The following guide shows how easy it is to set up automated Jest testing in CodeBuild and CodePipeline. There can be some nuances in setup depending on where the repository is kept, such as in AWS CodeCommit, GitLab, or GitHub. You may also see subtle differences based on the application's architecture, different build steps the application may have, and more, so keep in mind that each application will likely have slightly different setup steps. Jest has many other configuration options like generating coverage reports, excluding certain file types and paths in your directory, setting up global variables, and more, which could warrant its own blog post. Additionally, there are multiple ways to configure CodeBuild and CodePipeline. You can use the console with an interactive UI or set things up programmatically using AWS CLI, SDKs, or CloudFormation. There is a flavor combination to meet any need and comfort level. This guide isn't meant to be an all-encompassing tutorial, but the example below will show how simple automated Jest testing is to set up from scratch or drop into your existing CodeBuild and CodePipeline configuration.
Create or utilize an existing Git repository that stores the React application code.
Install and configure Jest in the React application. Write at least one test and manually run it locally to ensure it works as intended. Add the test script to package.json. Below is an example of the scripts in package.json for a NextJS React application with Jest. The "test" script would be used locally, and "test:ci" will be used in CodeBuild.
// file: package.json
"scripts": {
	"build": "next build",
	"dev": "next dev",
	"start": "next start",
	"test": "jest --watch",
	"test:ci": "jest"
},Create a buildspec.yml file in the root of your project directory. This file contains the build instructions for CodeBuild. It gives commands to install dependencies, build the React application, and run Jest tests. Below is an example buildspec.yml file:
phases:
install:
runtime-versions:
nodejs: 14
pre_build:
commands:
- npm ci
build:
commands:
- npm run build
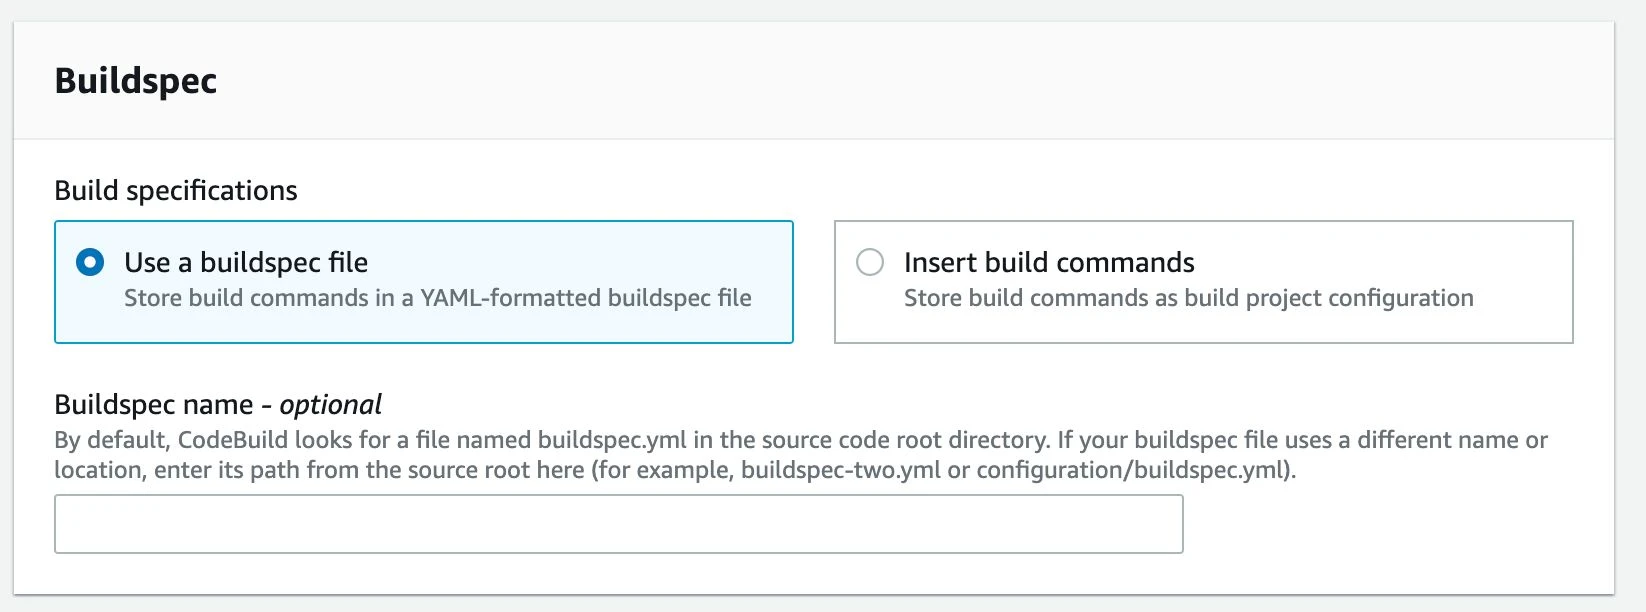
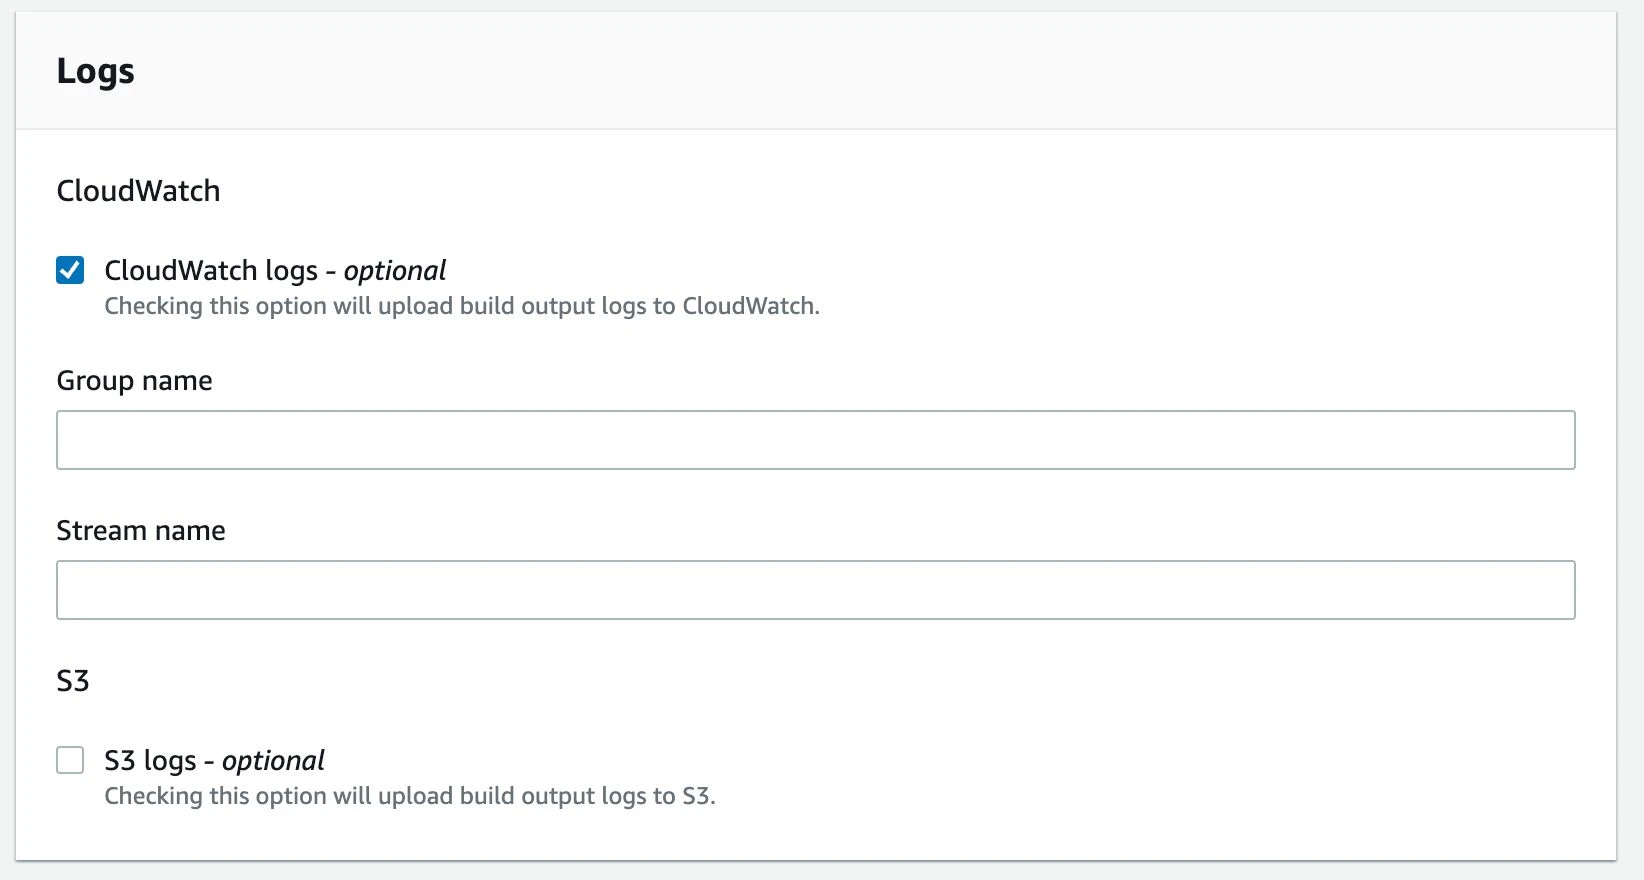
- npm test:ciCreate a CodeBuild project in the AWS Management Console. Configure the source code settings to connect to the Git repository and specify the build environment, including the operating system and runtime. Elect to use the buildspec.yml file that was created in step 3. Enable CloudWatch logs or S3 logs to allow logging for your build. The logs are where we see the output of the build, for instance, the output from Jest indicating all passing and failing tests.

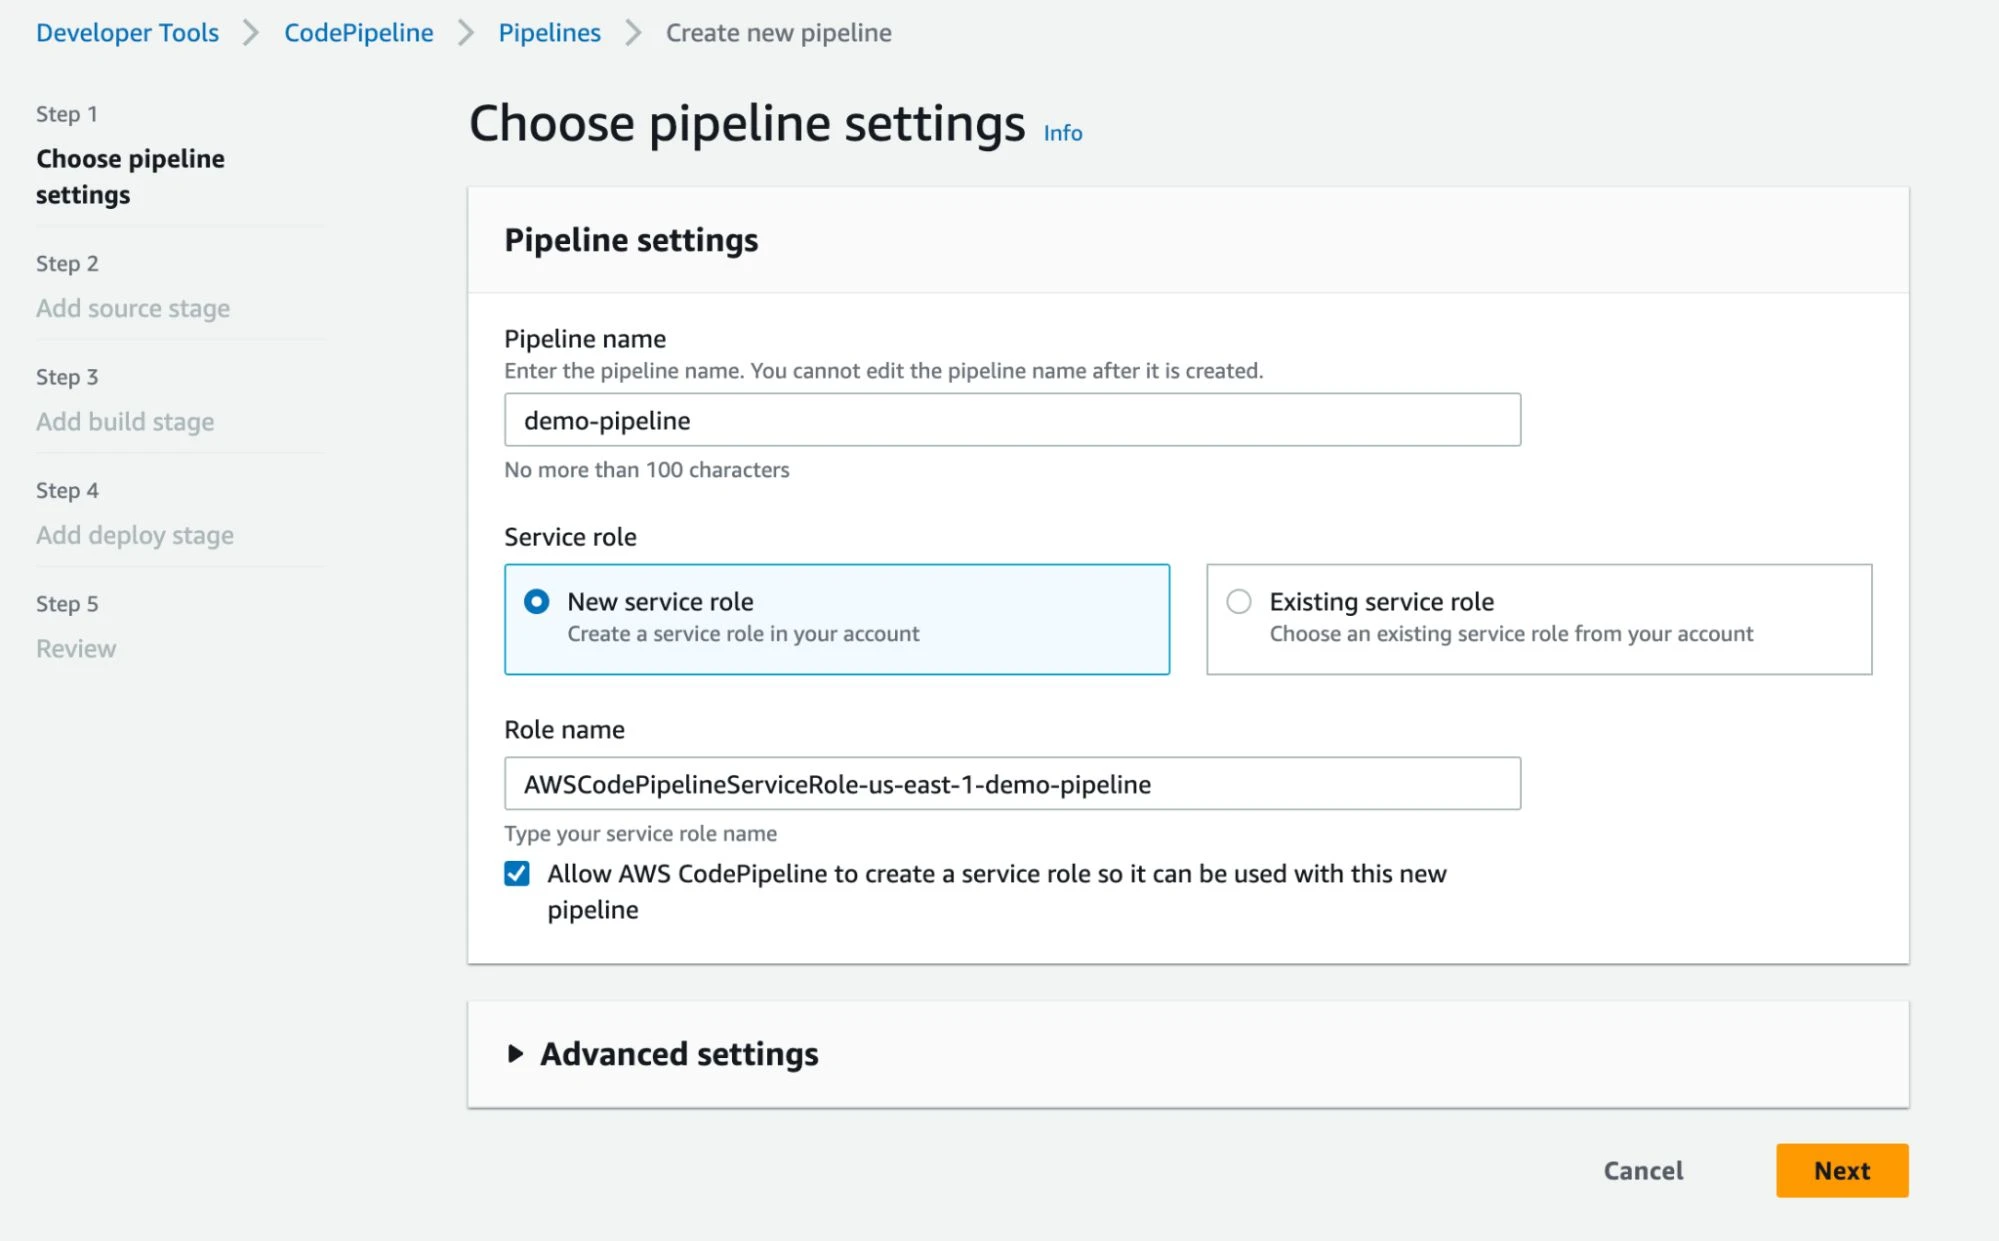
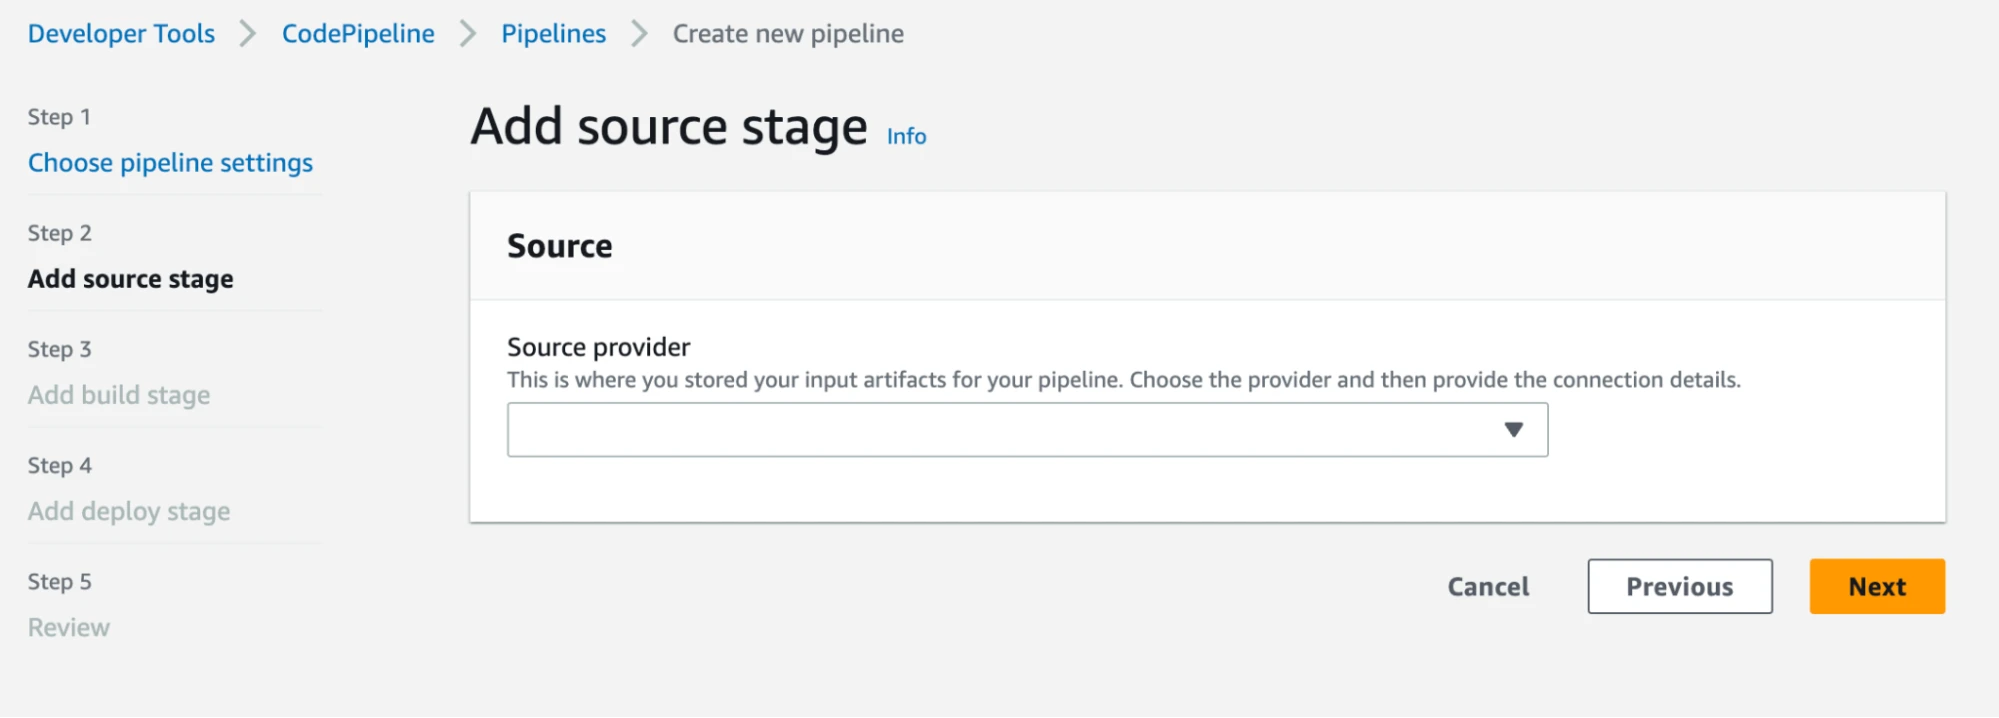
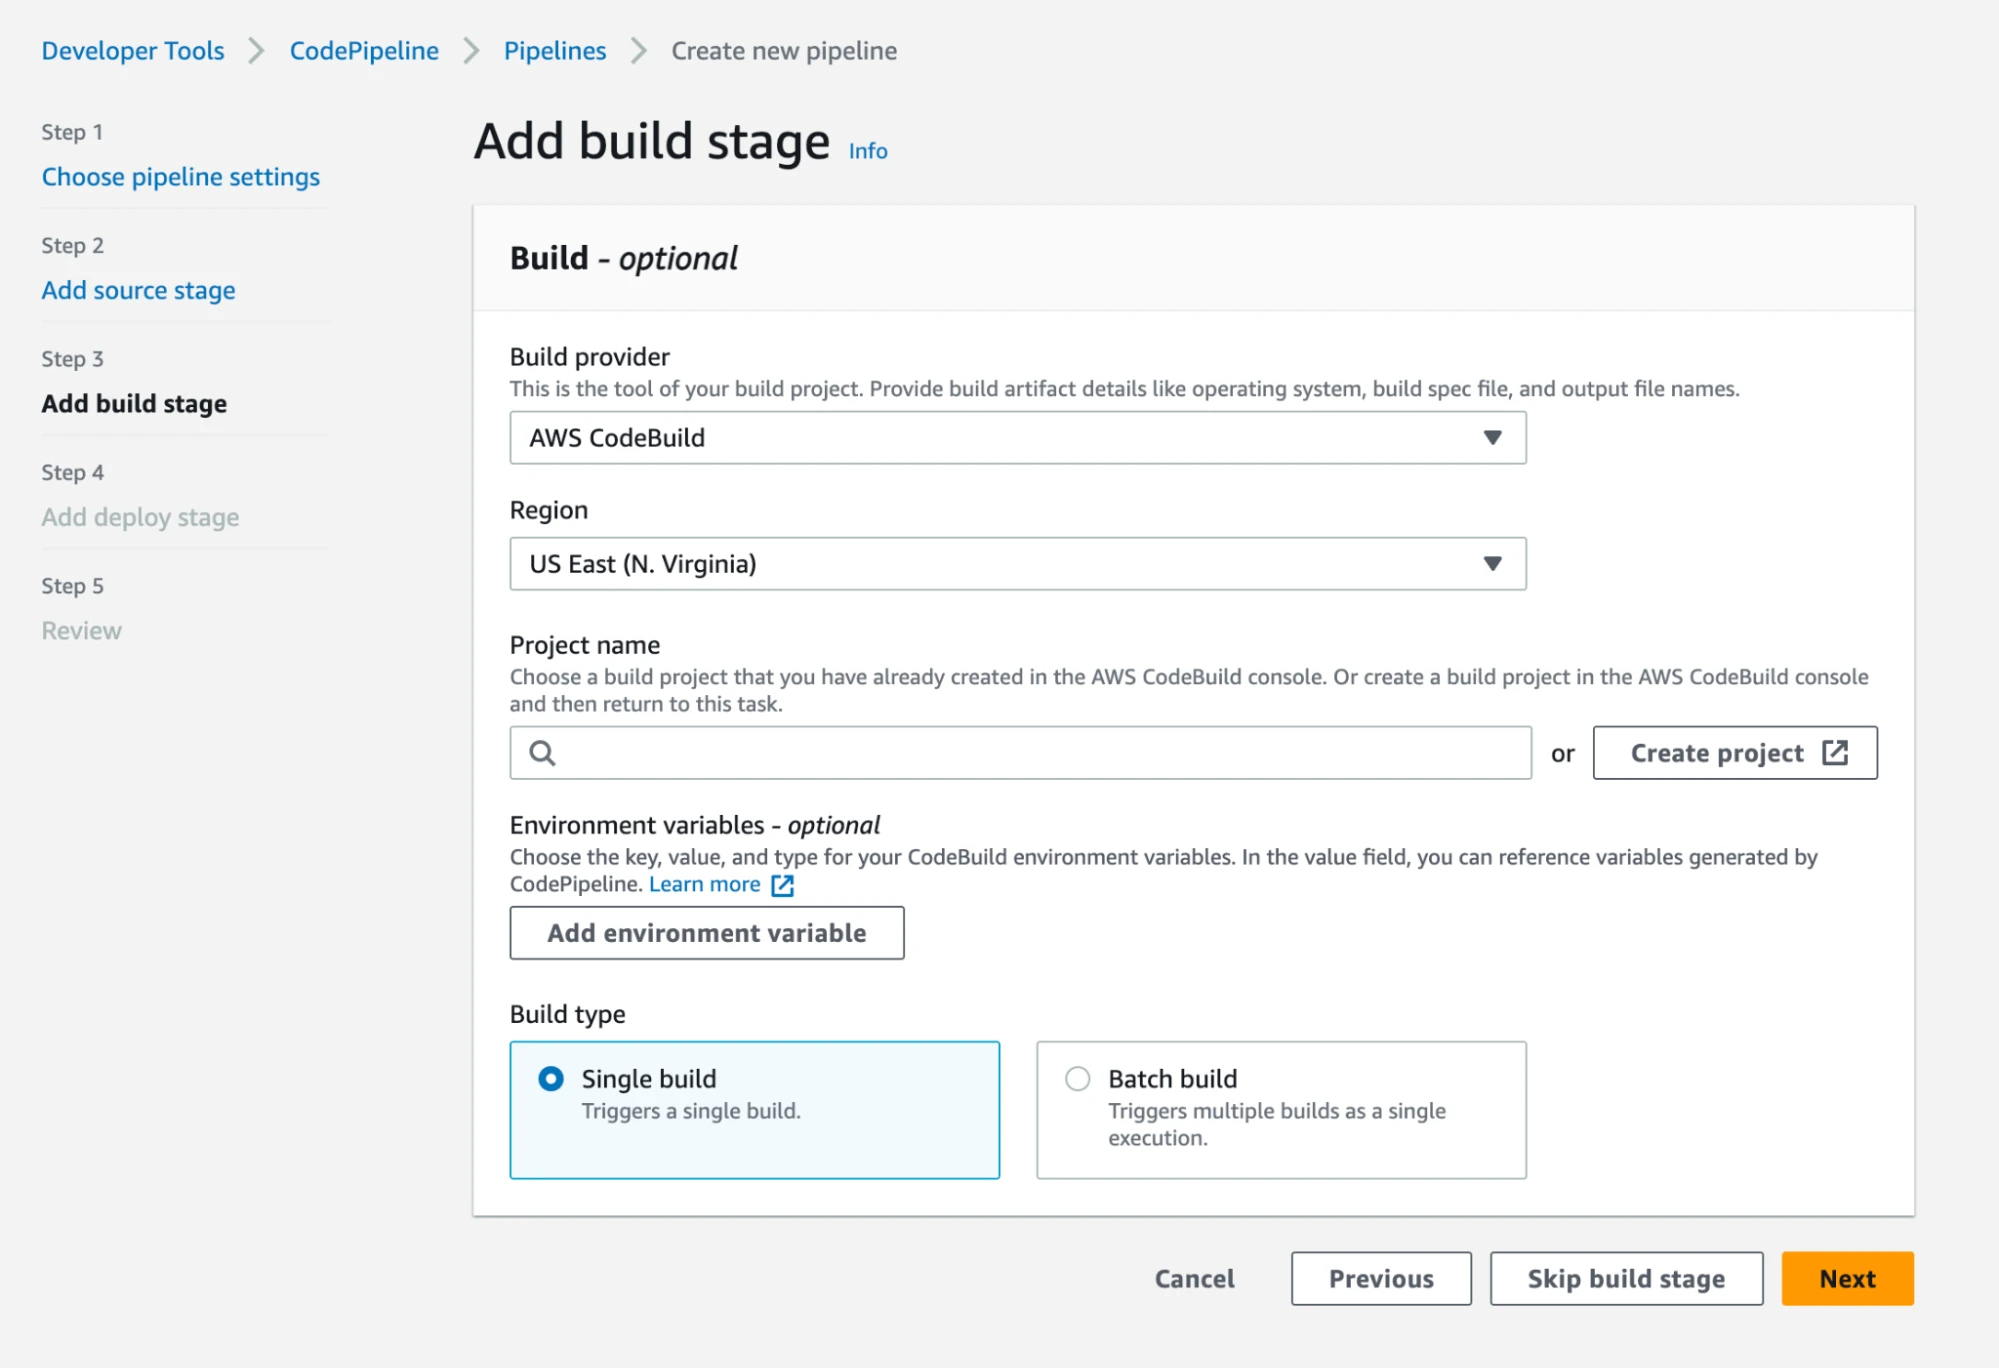
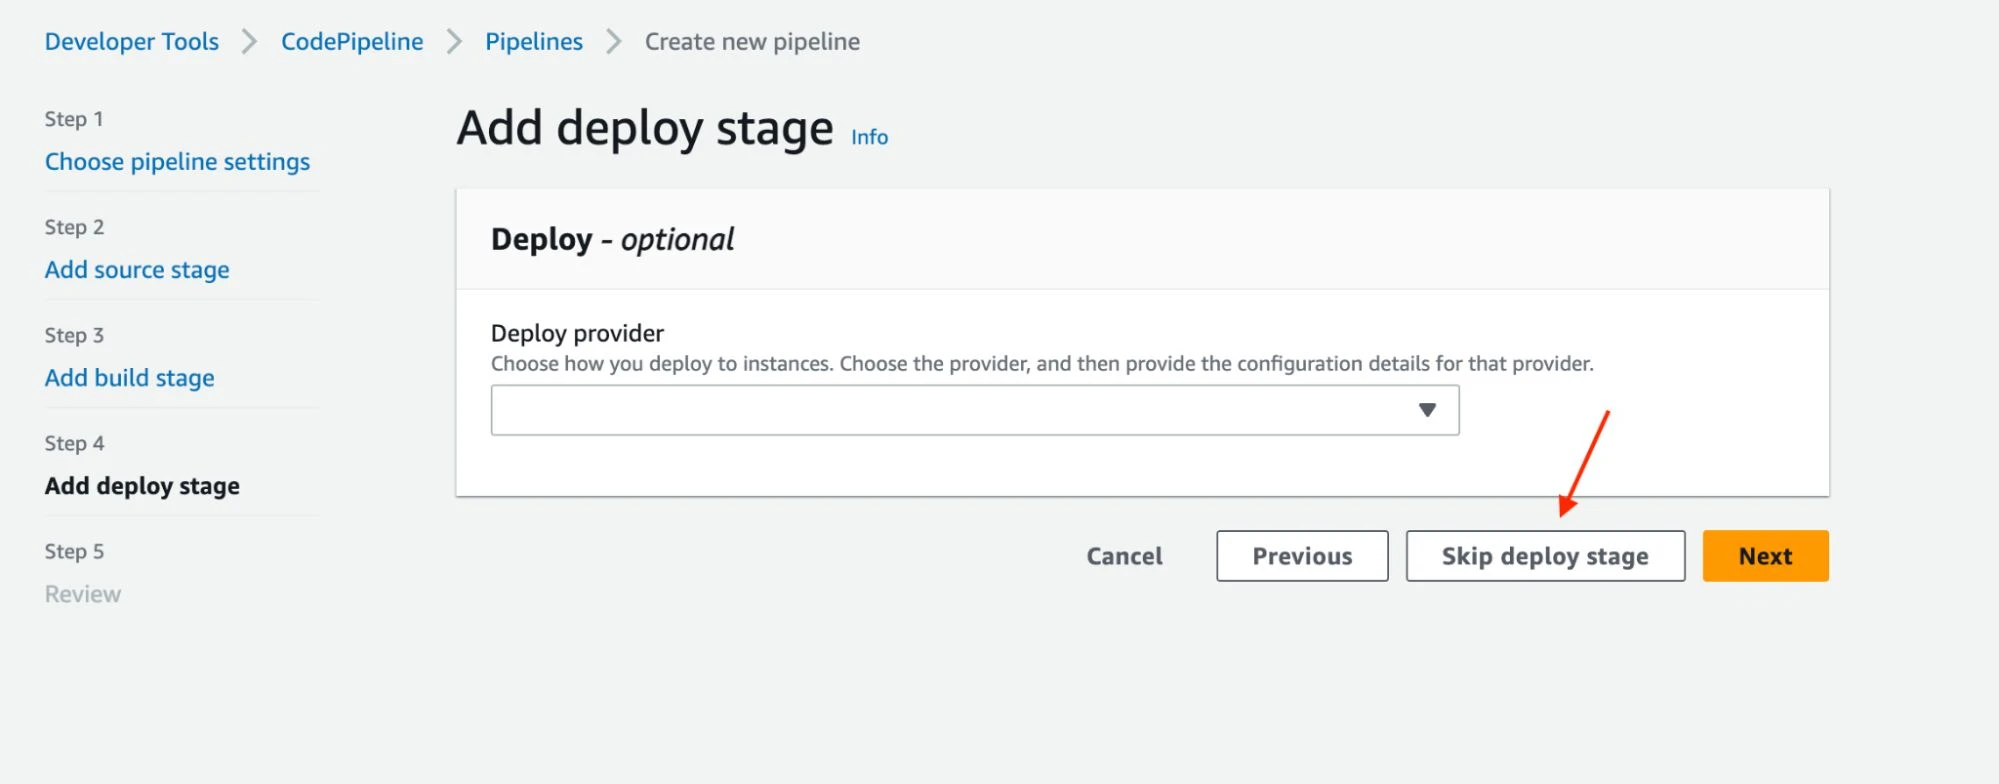
Create a pipeline using CodePipeline in the AWS Management Console. As shown in the screenshots below, name your pipeline, create a new service role, specify the source as your Git repository, and configure the CodeBuild project created in step 3 as the build stage action. Once completed, a source stage will pull the code into the pipeline and build stage, where the application is built and tested. We will skip the deploy stage in this tutorial, but this is where you would put your application on a host to make it accessible to users.

Trigger the CodePipeline to start the build and test process. Either manually trigger the pipeline to see it in action or configure it to trigger on every code commit or other events automatically.
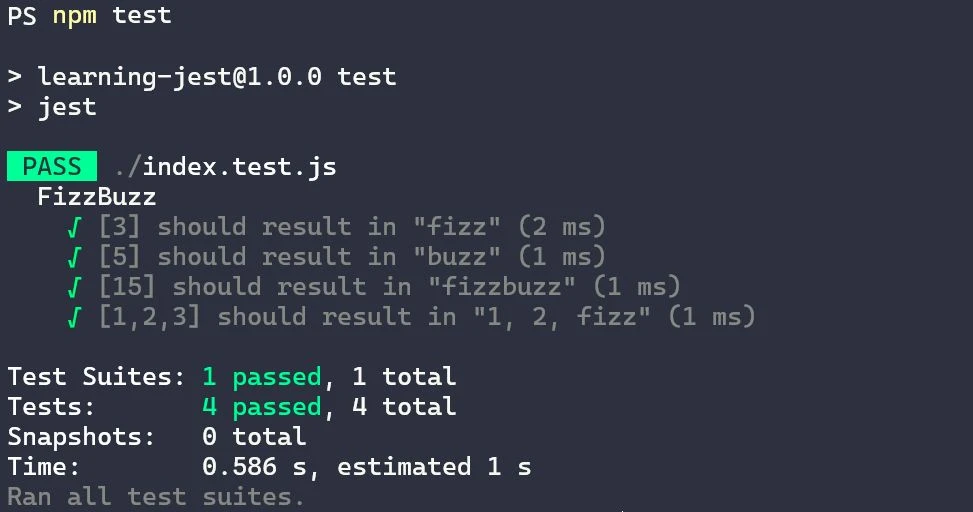
Monitor the CodePipeline for the build and test results. If any test fails then the pipeline will fail, which prevents you from releasing potentially buggy code. To view CodePipeline logs, click on your build project and navigate to the build logs tab. You should see something similar to the following Jest output. It details the results of all test suites, individual tests, and snapshots run along with the time it took to complete towards the end of your logs.
Coupling AWS’s offerings with Jest makes for an efficient and powerful solution to start running automated tests on your application. Jest’s lightweight nature, user-friendly API, comprehensive documentation, and impressive speed and efficiency, demonstrated by real-world examples like Airbnb's significant reduction in test run time, makes it the go-to framework for automating Javascript tests. The ease of configuration, management, and monitoring provided by AWS CodePipeline and AWS CodeBuild CI/CD solutions makes automating your Jest tests a walk in the park.
As we discussed, automated testing can be vital for the success of your business. Now you know how simple it is to set up automated testing to improve and safeguard your business. If you don’t already have automated testing set up for your Javascript or React application, give it a try. If you get stuck or want to avoid dealing with implementation, give Caylent a call! Our brilliant engineers can tackle this and anything else you throw our way.

Tristan is a Senior Cloud Software Engineer at Caylent, where he helps customers design and build reliable, efficient, and scalable cloud-native applications on AWS. Originally from Milwaukee, Wisconsin, he earned his degree from Milwaukee Area Technical College and holds both the AWS Solutions Architect Associate and AWS Certified Developer Associate certifications. When he’s not developing top-tier software, Tristan enjoys traveling, working on cars, exploring the outdoors with his dog, and maintaining his freshwater aquariums.
View Tristan's articlesCaylent Services
Deliver high-quality, scalable, cloud native, and user-friendly applications that allow you to focus on your business needs and deliver value to your end users faster.
Caylent Services
From rehosting to replatforming to rearchitecting, Caylent will help you leverage AWS to its fullest potential to meet your business objectives.


Explore all of the launches and capabilities announced at the 2026 AWS Summit in New York City, including Amazon Bedrock Managed Knowledge Base, AgentCore harness, AWS Context, and AWS Continuum.

Explore Amazon OpenSearch Serverless NextGen, AWS's new scale-to-zero architecture that decouples compute from storage to deliver faster autoscaling, lower costs for idle and agentic AI workloads, and offers a new approach to managing search and vector search collections.

Explore how building a multi-tenant SaaS platform changes when the infrastructure lives in customers’ AWS accounts, and the architectural lessons learned from managing resources across environments you don’t own or control.